Summary: Hydronic floor heating installation begins with understanding a home's heating needs and creating a custom system design. The process includes floor preparation, tubing placement, control system setup, pressure testing, and final adjustments. Each stage helps deliver balanced warmth, reliable operation, and long-term comfort. Proper planning and professional installation ensure the heating system performs efficiently throughout the entire property.
Many homeowners love the idea of warm floors, but few know what happens behind the scenes before a hydronic floor heating system starts working. A good system is not just about pipes under the floor. It starts with careful planning and ends with detailed testing to make sure every room gets the right amount of heat. The installation process plays a major role in how comfortable, reliable, and efficient the system will be over time. The best hydronic radiant floor heating systems work well because every step of the installation process is done correctly. From the first home visit to the final system check, each stage helps create a heating system that delivers steady comfort for many years.
Before any work begins, the heating contractor studies the home. This step helps determine how much heat each room needs. A large living room with many windows will not need the same amount of heat as a small bedroom or basement.
The goal is to understand how heat moves through the home. This information helps create a system that keeps rooms comfortable without wasting energy. Getting this step right can prevent hot spots, cold spots, and uneven temperatures later. It also helps the contractor choose the right system size. A system that is too small may struggle to keep rooms warm, while a system that is too large may not operate as efficiently as intended.
This early review gives the project a strong foundation. It helps ensure that every room receives the amount of warmth it needs throughout the heating season.
Hydronic floor heating is not a one-size-fits-all system. Every home has a different layout, different floor materials, and different heating needs.
A custom plan is created before installation starts. This plan shows where the tubing will go, how the heating zones will be divided, and how warm each area should be. Proper planning helps the system provide smooth and even heat across the entire floor.
This stage also helps avoid future problems. Careful planning can improve comfort in large open spaces, finished basements, bathrooms, kitchens, and other important areas of the home. A well-prepared design makes installation easier and helps the system perform better over the long term.
The floor structure plays a big role in heating performance. Before the tubing is placed, the area is prepared with materials that help direct heat into the room.
Without proper preparation, some of the heat can move away from the living space. Preparing the floor correctly helps the system work better and improves overall comfort inside the home. It also helps the heated floor respond more effectively after the system starts operating.
The contractor checks that the surface is ready and that all materials are installed correctly before moving to the next stage. This attention to detail helps support long-lasting system performance.
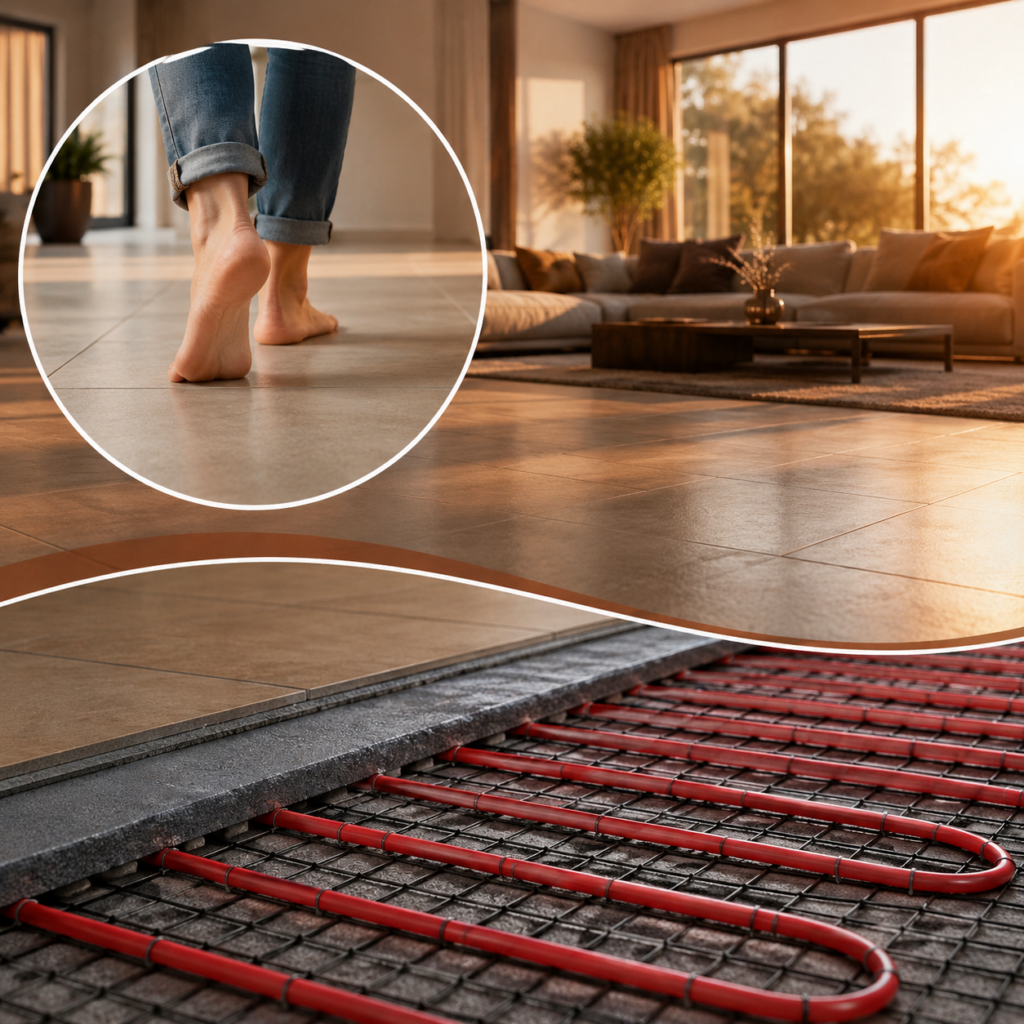
Many people think the tubing is simply placed under the floor in straight lines. In reality, the layout is carefully designed to match the needs of each room.
Areas with more heat loss may need tubing placed closer together. Other spaces may need a different pattern to keep temperatures even. This stage helps create a floor that feels comfortable from one side of the room to the other.
Homeowners looking into hydronic heating system installation Ontario often learn that tubing design is one of the most important parts of the entire project. A properly designed layout helps create balanced warmth and improves comfort in every part of the home.
Once the tubing is in place, the next step is connecting the system components. These parts control how warm the water becomes and how it moves through different areas of the home.
The controls help maintain steady temperatures throughout the day. They also allow different rooms to receive the amount of heat they need instead of heating the entire house the same way.
This level of control gives homeowners greater comfort and flexibility. Family members can enjoy comfortable temperatures in different areas without affecting the rest of the house.
Before the finished floor is installed, the tubing system goes through a full pressure test. This test checks that everything is working properly and that all connections are secure.
Finding and fixing any issue at this stage is much easier than after the flooring is complete. This step helps protect the system and gives homeowners confidence that it is ready for daily use.
Testing is an important part of quality installation. It helps confirm that the system is prepared for long-term operation and that every part is functioning as expected.
After the flooring is installed, the heating system is adjusted and checked one final time. Water flow, room temperatures, and control settings are reviewed to make sure everything works as planned.
Small adjustments can make a big difference in comfort. This final setup helps every room receive balanced heat and keeps the system running smoothly. It also helps the system respond properly to changing heating needs throughout the year.
A carefully adjusted system can provide dependable comfort while helping homeowners enjoy the full benefits of radiant floor heating.
Ending Note:
At Canadian In-Floor Radiant Solutions Inc., our goal is to build heating systems that match the way people live. We carefully plan every project, from the first design stage to the final system check, so homeowners can enjoy reliable comfort throughout the year. Our team understands that every property is different, which is why we create custom solutions based on the unique needs of each home. Whether you are building a new home, upgrading a basement, heating a garage, or comparing options such as hydronic snowmelt system cost, our team creates solutions that are built around your property's needs and long-term performance goals.
Contact Canadian In-Floor Radiant Solutions Inc. today to schedule a consultation. Our team will help you choose the right heating system, answer your questions, and create a custom solution that brings comfortable warmth to every part of your home.
1. How long does a hydronic floor heating installation take?
The timeline depends on the size of the project and flooring type. Most installations take several days and include planning, installation, testing, and final system setup.
2. Can hydronic floor heating be installed in an existing home?
Yes. Hydronic floor heating can be added during renovations or remodeling projects. A professional assessment helps determine the best installation method for the property.
3. What flooring works best with hydronic floor heating?
Tile, concrete, engineered wood, and luxury vinyl are common choices. The right flooring helps transfer heat effectively and supports system performance.
4. Does hydronic floor heating provide even warmth?
Yes. A properly designed system distributes heat across the floor surface, helping reduce cold spots and creating comfortable temperatures throughout the home.
5. Why is professional installation important for hydronic floor heating?
Professional installation ensures correct design, tubing placement, system testing, and control setup, helping the system deliver reliable comfort and long-term performance.
Expert heating solutions for your home and business — from radiant floors to snow melting and pool heating systems.
Unit #2, 633 Enfield Rd, Burlington, Ontario L7T 2X9, Canada.